Quantcast
Channel: Tricks of the Trade – ALiEM
Viewing all 78 articles
Browse latest View live

Trick of the Trade: Parting the hair for scalp laceration repair

$
0
0

scalp laceration 1Trying to suture or staple a scalp laceration is oftentimes a hairy proposition for emergency physicians who repair these types of wounds regularly. Although the “hair apposition technique” method is one option, if one opts for sutures or staples, the most difficult part of the procedure is trying to avoid trapping hair strands within the wound, which may cause wound dehiscense, a foreign body reaction, or a local infection. 

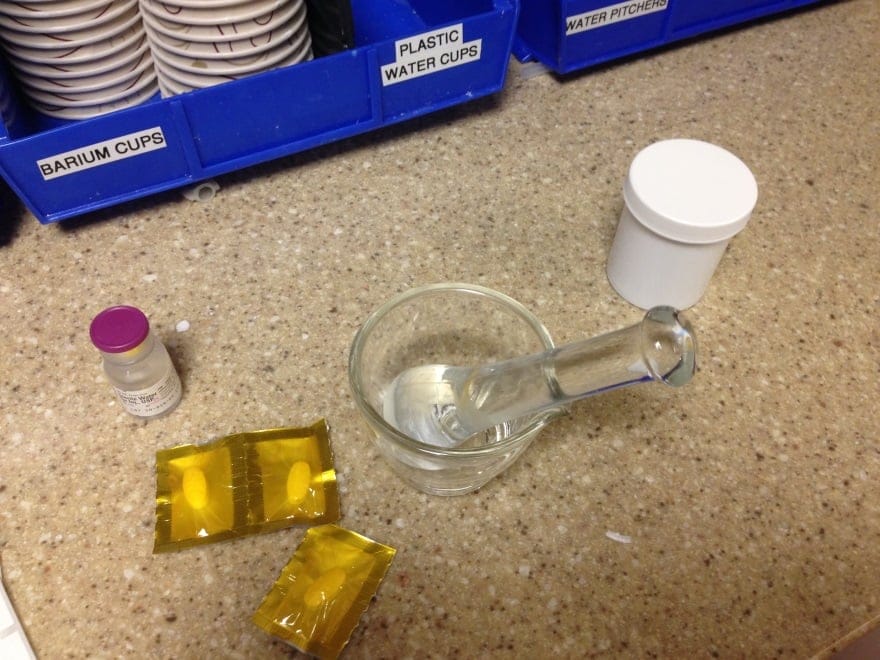
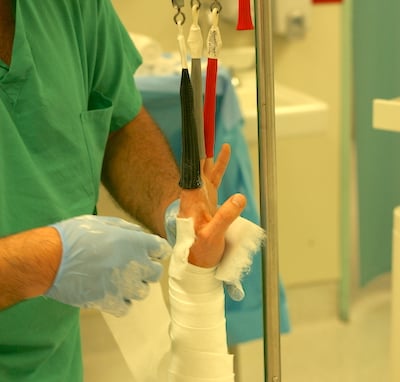
Trick of the Trade: Part the hair away from the scalp laceration with petroleum-based jelly

scalp laceration jelly

A useful solution to this problem is through the use of a thick petroleum-based ointment to displace the hair to each side of the wound. Bacitracin or similar topical antibiotic derivatives can be used, as can petroleum jelly.

Author information

Jeff Wiswell, MD
Jeff Wiswell, MD
Ultrasound Fellow
Department of Emergency Medicine
University of California, Davis (UCD)

The post Trick of the Trade: Parting the hair for scalp laceration repair appeared first on ALiEM.


Trick of the Trade: Nasal foreign body removal using foley catheter

$
0
0

Beads2-1A healthy 4 year-old boy is brought in by mom for a plastic bead up his nose. The mom states, “The last time the other doctors had to be called, and it took forever. Oh, and I have to pick up his brother from school in 30 minutes. Can you get it out, doc?” The patient is squirming even as you take a quick peek at his nose, but you catch a glimmer of the bead up his right nare.  

Trick of the trade: Remove nasal foreign body with Foley catheter (or Katz extractor)

Foley 7F catheterFoley Catheter (8 French)

  1. Don protective gear and plan for adequate lighting
  2. Obtain and test balloon functionality of a 6F (or 8F) Foley catheter
  3. Consider wrapping the child in a sheet to ensure optimal procedural conditions
  4. Insert the Foley tip just past the bead
  5. Inflate the balloon with air
  6. Pull the Foley out of the nose with gentle traction until the bead pops out!

Alternatively, the video above by Dr. Mellick demonstrates how a Katz Extractor can be used (start at 00:34 if you want to skip the introduction). This commercial device is based on the same idea, but it is more rigid, allowing for a single-handed technique. The catheter-based approach is often a favorite of emergency physicians over positive or negative pressure, glue, or forceps, because anecdotally it is better tolerated by patients and parents. However, the limited available literature is not able to support one technique over another.

Pitfalls:

  1. Visualization: This technique still requires visualization. Do not insert the catheter blindly as the foreign body may dislodge posteriorly. If it does, immediately check the oropharynx.
  2. Although not reported, this may be a technique theoretically to avoid in very posterior foreign bodies as they may be at increased risk for aspiration. 

Pearls

  1. Have good lighting: Use a headlamp as opposed to an otoscope for visualization, as it frees up both hands to place and inflate the catheter (prior Trick of the Trade).
  2. Positioning: Just like any procedure, positioning is key, and even more so in awake young children who will only give you one chance to attempt the procedure. Use a sheet or papoose board to keep the patient properly positioned. If you have a child life specialist, use him or her.
  3. Nasal vasoconstriction: Consider using oxymetazoline or 0.5% phenylephrine (Neo-Synephrine). This allows for easier passage of the catheter behind the foreign body. Also consider topical lidocaine for analgesia. Often lubricant is not necessary as there is much natural lubrication from accumulated nasal discharge.

References

  1. Davies PH, Benger JR. Foreign bodies in the nose and ear: a review of techniques for removal in the emergency department. J Accid Emerg Med 2000;17:91-94. PDF
  2. Heim SW, Maughan KL. Foreign bodies in the ear, nose, and throat. Am Fam Physician. 2007 Oct; 76(8):1185-89. .
  3. Fox JR. Fogarty catheter removal of nasal foreign bodies. Ann Emerg Med. 1980;9:37-8. 
  4. Kiger JR, Brenkert TE, Losek JD. Nasal foreign body removal in children. Pediatr Emerg Care. 2008 Nov;24(11): 785-92.
  5. Leach AJ. Evidence based problem solving in general practice: the foreign body in the nose. JR Army Med Corps. 2000 Feb;146(1):31-2. 
  6. Katz Extractor website

Disclosures: I do not have any financial ties with Katz Extractor or Foley Catheters.

Author information

Maria Beylin, MD
Maria Beylin, MD
Maria Beylin, MD
Emergency Medicine Resident
UCSF-San Francisco General Hospital

The post Trick of the Trade: Nasal foreign body removal using foley catheter appeared first on ALiEM.

Trick of the Trade: Making your own homemade ultrasound gel

$
0
0

UltrasoundKenyaExpertPeerReviewStamp2x200You are spending a month in rural Kenya, doing an ultrasound teaching course. Your enthusiastic participants have been ultrasounding every chance they get. Unfortunately, this has caused your ultrasound gel supplies to dwindle. It will be a month before a new shipment of gel arrives from Nairobi. This gel will cost about $5 per bottle, which is a considerable expense for the local hospital’s budget.

Trick of the Trade: Homemade ultrasound gel

With a few simple and ubiquitous ingredients, you can make your own ultrasound gel to use. 

PIC1

Equipment Needed 

  • Corn starch
  • Water
  • Pot or pan
  • Heat source
  • Empty and clean bottle 

PIC2

Technique

  1. Combine 1 part corn starch to 10 parts water in a pan. Here, we use ¼ cup corn starch to 2 ½ cups water to make about 2 gel bottles full.
  2. Heat this mixture while stirring constantly at medium heat for 5-10 minutes.
  3. When the substance begins to boil, turn off the heat and allow the mixture to cool.
  4. Pour the mixture into a clean, preferably sterilized, container. Here, we use an old commercial ultrasound gel bottle which we placed in boiling water for 10 minutes first.
  5. Ultrasound away! Note that the gel should be used within 48-72 hours for best results. After that, it may begin to separate a bit.

PIC3

Word of Caution

This homemade gel does not have the same bacteriostatic ingredients that are in commercial ultrasound gel. Therefore we do no recommend its use for skin and soft tissue infections.

Expert Peer Review

April 11, 2014

For anyone who has spent time working abroad in a low resource area, you are likely familiar with the utility of ultrasound. It has a wide range of applications, it is easy to use, and there is an increasing number of portable machines available. There are very few ongoing costs associated with the use of ultrasound machines. The exception to this is ultrasound gel.

There is very little published about ultrasound gel alternatives. The 1995 WHO Manual of Diagnostic Ultrasound [1] contains a recipe for making your own ultrasound gel which requires many chemicals not available in most low resource settings. Olive oil has been studied as a feasible alternative [2] but is messy and provides less surface contact between the patient and the probe. Water baths have been looked at but are only applicable to extremity ultrasound [3].

In our recent pilot study [4], we found that a cornstarch-based alternative is at least comparable to commercial gel. Our study, which is a randomized blinded trial (abstract forthcoming at SAEM 2014) found no statistically significant difference between commercial gel and the cornstarch alternative in terms of image quality. The cornstarch-based alternative is an easily created, easily used, extremely inexpensive option that will hopefully make ultrasound more feasible and accessible in low resource settings.”

Reference

  1. Manual of diagnostic Ultrasound [PDF 3.6 MB], 2nd Edition. World Health Organization. 2011. Retrieved Aug 13, 2012 
  2. Luewan S, Srisupundit K, Tongsong T. A comparison of sonographic image quality between the examinations using gel and olive oil as sound media. J Med Assoc Thai. 2007 April; 90(4)624-7. Pubmed
  3. Blaivas M, Lyon M, Brannam L, et al. Water bath evaluation technique for emergency ultrasound of painful superficial structures. Am J Emerg Med. 2004 Nov;22(7):589-93. Pubmed
  4. Binkowski A, Riguzzi A, Fahimi J, Price D. Evaluation of a Cornstarch-Based Ultrasound Gel Alternative for Low-Resource Settings. J Emerg Med. 2013 Nov 12. pii: S0736-4679(13)01064-0. Pubmed
Allison Binkowski, MD, Emergency Physician, Ventura County Medical Center


Top image


Author information

Christine Riguzzi, MD
Ultrasound Fellow
Department of Emergency Medicine
Highland General Hospital-Alameda Health System

The post Trick of the Trade: Making your own homemade ultrasound gel appeared first on ALiEM.

Trick of the Trade: Nail Bed Repair With Tissue Adhesive Glue

$
0
0

Nail Bed RepairPatients with fingertip injuries involving the nail bed typically present to the emergency department and require meticulous repair of the nail bed to prevent long-term cosmetic and functional disability. There are several methods to repair nail beds, typically involving absorbable suture, but maybe there is a faster way with similar cosmetic and functional outcomes. 

Case

A 28 year old, left handed female comes to your ED with a chief complaint of having her left thumb slammed in a car door.  She has no past medical problems or surgeries and no allergies to medications. Her injury is shown below:

IMG_4033


The patients finger was anesthetized with a 3 point ring block at the base of the thumb, and the nail was then removed.  There was also a small nail bed laceration that did require some absorbable sutures. After repair of the nail bed laceration, an 18 gauge needle was used to place 4 holes in the nail itself so that the The nail could be reinserted and secured with 4-0 vicryl sutures. But could there have been an alternative approach?

ThumbAndNail

Trick of the Trade: Nail bed repair with tissue adhesive glue

Instead of sutures, tissue adhesive can be used for two purposes:

  1. Repairing a nail bed laceration
  2. Holding the nail in place

The picture below shows an example of how the nail can be slid back into place and secured with glue.

ToenailDermabond2sm

Evidence behind the trick:

Dermabond for nail bed laceration repair [1]


What they did

  • Prospective comparison of 2-octylcyanoacrylate (Dermabond; Ethicon Inc, Somerville, NJ) vs standard suture repair using 6-0 chromic
  • 40 consecutive patients

Outcomes

  • Time to repair
  • Cosmetic and functional outcomes at 1, 3, and 6 months

Results

  • Time to repair: 9.5 min (Dermabond) vs 27.8 min (standard suture repair)
  • Infection rate: 1 patient (Dermabond) vs 0 patients (standard suture repair)
  • No statistical difference in physician judged cosmesis, patient perceived cosmesis, or patient perceived functional outcomes

Trick of the Trade: Nail Bed Repair With Dermabond

Limitations:

  • Repairs were performed by orthopedic residents and not emergency medicine residents
  • Small sample size was a major issue: Only allowed for statistically significant difference in time of repair
  • Dominant hand injury was < 50% of cases in both groups which may have biased functional scores
  • There was a disproportionate number of stellate lacerations in the standard suture repair group (6) vs Dermabond group (3), which may have biased the results.

Conclusion: Dermabond is an efficient and effective alternative to sutures in nail bed injuries.

Take Home Message

Nail bed repair with Dermabond (and likely all tissue adhesive glues) may be a reasonable alternative to sutures for both nail bed laceration repair itself, as well as to hold the nail in place.


Post updated May 26, 2014 (22:47 PST)


References

  1. E.J. Strauss, W.M. Weil, C. Jordan, and N. Paksima, "A prospective, randomized, controlled trial of 2-octylcyanoacrylate versus suture repair for nail bed injuries.", The Journal of hand surgery, 2008. http://www.ncbi.nlm.nih.gov/pubmed/18294549

Author information

Salim Rezaie, MD
Salim Rezaie, MD
ALiEM Associate Editor
Clinical Assistant Professor of EM and IM
University of Texas Health Science Center at San Antonio
Founder, Editor, Author of R.E.B.E.L. EM and REBEL Reviews

The post Trick of the Trade: Nail Bed Repair With Tissue Adhesive Glue appeared first on ALiEM.

Simulation Trick of the Trade: Bleeding Cricothyroidotomy Model

$
0
0

Surgic-Airway-Step1-596x600One advantage of simulation as an educational tool is the re-creation of cognitive and emotional stresses in caring for patients. Doing this for a high fidelity scenario is relatively easy – add additional patients, make a them loud, combative, or otherwise cantankerous, and add interruptions for good measure. However, when training for procedures in the simulation lab, we practice the procedure in isolation on a “task trainer” without cognitive and emotional stress for context. An off-the-shelf task trainer can do a superb job of teaching the mechanics of performing a procedure, but they lack complexity necessary to train for performing the procedure under stress. For cricothyroidotomy, a procedure that is essentially performed blind due to blood and small spaces, adding additional realism means crafting a model that not only contains the correct anatomic landmarks, but also has the ability to bleed significantly enough to obscure the view of the performer. To borrow a phrase from Cliff Reid and from the military, to be able to perform these procedures expertly we must “train like we fight” [1,2]. The following trick involves making a silicone-based skin layer which will bleed profusely when cut into.

Simulation Trick of the Trade: A Bleeding Cricothyroidotomy Model

Procedure

  1. Get a 8”x 8”cake pan and liberally spray with silicone releasing agent

Step 1-1

Step 1-2

  1. Use a silicone rubber mix, such as Dragon Skin which is used for movie costumes and in animatronics. Combine approximately 1/3 cup of part A with 1/3 cup of part B, along with several drops of a coloring agent in a cup. 

PART A

Step 2-1

PART B

Step 2-2

COLORING AGENT

Step 2-3   Step 2-4

  1. Pour the silicone mixture into the prepared cake pan and spread to make a very thin layer (about 2 mm). Any bubbles in the mixture should rise to the top and pop by themselves. You can speed this process by agitating the mix, such as beating it against a solid object.

Step 3-1   Step-3-2

  1. Leave the cake pan on a level surface for whatever the recommended drying time is for the product you picked. Typically this is an overnight process.
  1. Remove the thin sheet of silicone from the pan. Cut a 4”x 8”section and a 3”x 3”square.

Step 5-1   Step 5-2

  1. Cut off the Luer lock end of a 32-inch IV extension set and rest this end on top of the 4”x 8”rectangle piece, along with a small amount of polyfill material (a polyester stuffing commonly used in pillows and clothing). The polyfill helps disperse the “blood” evenly in the pocket and helps obscure view of the cricothyroid membrane when the skin is incised.

Step 6-1

Step 6-2

Step 6-3

  1. Glue the smaller silicone square on top of the larger rectangular piece, while sandwiching in the IV tubing. Use silicone glue to make sure all the edges are sealed to create a completely closed pocket between the two silicone pieces. Be careful to not get any glue on the tip of the IV tubing. To ensure all the edges are air tight, attach a 20-30 mL syringe on the IV tubing and gently apply suction. If you have a leak, continue to liberally apply glue to the margins of the 3”x 3”square until it is sealed.

Step 7-1

Step 7-2

Step 7-3

Step 7-4

  1. Let dry again overnight.

See it in Action!

The video below shows how using this bleeding model can supplement a cricothyroidotomy simulation procedure but adding the realistic effect of active bleeding.

Quick pointers

  1. For heightened realism, lay this skin over the top of a sheep or pig trachea as they have the anatomic landmarks most similar to human anatomy with a realistic tissue feel. If unavailable, a plastic training model would work. There are also some jerry rigged models you can make with ventilator tubing and tape that would work in a pinch. The end product model can be a bit messy so I would be hesitant to put this skin over something of significant financial value such as the majority of the high fidelity simulation manikins.
  2. Thinness is key. Getting the layer of silicone to be thin and even is quite challenging but well worth the extra effort. If the “skin”is too thick, you won’t be able to palpate landmarks thus hindering the realism of the procedural trainer.
  3. Most of these supplies can be ordered online. The polyfill material used in step 6 can be purchased at any hobby shop.
  4. I used a commercially available 2-part silicone mix that has a slow set up time. You may be able to speed the process along by using a mix that has a faster set up time. For me, it takes at least 2 days (of mostly drying time) to fully make the “bleeding skin” model.

Edited by: Nikita Joshi MD Associate Editor

References

  1. Biddinger PD, Baggish A, Harrington L, et al. Be Prepared —The Boston Marathon and Mass-Casualty Events. N Engl J Med. 2013. May 23; 368(21): 1958–60. PMID: 23635020.
  2. Reid C. How You Train is How You Fight. Resus.Me. Jan 1, 2014. Accessed May 20, 2014.

This post contains images and references to several commercial products.  I have no financial stake in the companies that make these products and no conflicts of interest to disclose.

Author information

Jeff Hill, MD
Jeff Hill, MD
Education Fellow
Assistant Professor
Department of Emergency Medicine
University of Cincinnati

The post Simulation Trick of the Trade: Bleeding Cricothyroidotomy Model appeared first on ALiEM.

Trick of the Trade: V-to-Y flap laceration repair for tension wounds

$
0
0

Laceration repairYou see a patient with a large V-shaped laceration under tension requiring suture repair. Resist the temptation to simply pull the edges together and close the laceration with simple interrupted or running sutures. Excessive tension on a flap edge during the healing process can compromise its blood supply. This causes ischemia to the healing tissue, which in turn makes that flap edge more likely to dehisce, necrose, and become infected.

Trick of the Trade:

Laceration repair using V-to-Y flap technique

Consider reducing the wound tension by converting the V-flap in to a Y-shaped flap using a carefully placed half-buried horizontal mattress suture (also known as a corner suture).  An extra few minutes spent planning this closure will facilitate easier immediate closure and create a better long term outcome for your patient.

Video from Dr. Brian Lin’s website (LacerationRepair.com)

 For a more detailed diagrammatic explanation of this technique, visit the full blog post at my site.


Want to hear more from Dr. Brian Lin?

Brian will be one of the featured speakers at the 2015 High Risk Emergency Medicine Conference in Hawaii. There he will be talking about not only Advanced Laceration Management but also Abdominal Vascular Emergencies, Burns, and Eye Emergencies!


Author information

Brian Lin, MD

UCSF Assistant Professor of Emergency Medicine

Kaiser Permanente Hospital, San Francisco, CA

Founder and author, LacerationRepair.com

The post Trick of the Trade: V-to-Y flap laceration repair for tension wounds appeared first on ALiEM.

Trick of the Trade: Insect removal from the ear

$
0
0

Insect FBInsect removal from the ear is a foreign body removal procedure with unique considerations. First, insects are friable. Have you ever squashed a house centipede? It’s like their 700 legs are spring-loaded to fall off instantly when touched. This characteristic makes mechanical removal by alligator forceps or cerumen loops less reliable. Second, they are alive which means they can move during your attempted extraction procedure.

Trick of the Trade

Use a Frazier suction device to remove the intra-aural critter.

Frazier Catheter

Prep for success: First achieve inner peace

The idea of having a critter in one’s ear can be very disconcerting. Consider sedation for the patient to optimize patient comfort and tolerance of the procedure. Although I am becoming a big fan of ketamine, I can only imagine that if any patient is going to have an emergence reaction, it’s the one who believes s/he is actively living out a horror movie… nonetheless it is recommended in Roberts and Hedges [1].

Prep for success: Prevent addition damage

Before extracting the insect, you must kill it or otherwise immobilize it to prevent ongoing intra-aural damage by the insect. Many providers drown the insect in viscous lidocaine. We used 1% NON-viscous lidocaine. Although a small 1993 study showed that microscope immersion oil killed cockroaches faster than lidocaine (27 vs 41 seconds), finding immersion oil in the today’s Emergency Department may be challenging [2]. There still remains much debate about which solution is the best to immobilize/kill the insect.

Frazier Suction Technique

The Frazier suction device, often found in your ENT kit, should be connected to low continuous suction. Once you are convinced that the insect is dead, slowly advance the suction catheter into the patient’s external ear canal. Be sure to inform the patient of each step to avoid accidental head movement. Occlude the insufflation port to suction out the contents of the patient’s ear canal. Once no more liquid returns, withdraw the catheter and hopefully you will be the proud owner of a dead insect.

Our team felt that this suction-based technique is superior to a manual extraction of the insect with forceps, because it would seem to cause less “shredding” of the insect into smaller debris pieces. Creating such debris should be avoided, according to Tintinalli [3].


References

  1. Roberts JR, Catherine BC, Todd WT, Jerris RH. Roberts and Hedges’ Clinical Procedures in Emergency Medicine. 6th edition. 2014. (pages 1316-7).
  2. Leffler S, Cheney P, Tandberg D. Chemical immobilization and killing of intra-aural roaches: an in vitro comparative study. Ann Emerg Med. 1993 Dec;22(12):1795-8. PMID: 8239097.
  3. Tintinalli, JE, J. Stephan S. Tintinalli’s Emergency Medicine: A Comprehensive Study Guide. 7th edition. New York: McGraw-Hill, 2011 (page 1556).


For plastic bead removal from the ear, read another approach to intra-aural foreign body removal.

Author information

Mitchell Li, MD

Mitchell Li, MD

Emergency Medicine Resident

St. John Hospital

Detroit, MI

The post Trick of the Trade: Insect removal from the ear appeared first on ALiEM.

Trick of the Trade: Pediatric video laryngoscope for ear foreign bodies

$
0
0

tweezerIt is near the end of your shift and one of the nurses asks you to see a fellow ED staff member’s nine-year old daughter who has accidentally put a foreign body into her ear. You go see her and the otoscope reveals a small shiny jewel within the ear canal however flushing does not work to get it out. Next you try using the otoscope, while exposing the ear canal and holding the forceps to grasp the object. Unfortunately, it is difficult to get your assistant to align the light, and the otoscope speculum is limited in view and access.

Trick of the Trade: Pediatric video laryngoscope for better visualization

Using a Miller 0 blade of a pediatric video laryngoscope (in this case we used a C-MAC), you are able to provide exposure to the ear canal and light as well as allow access to remove the object. The jewel is easily removed with forceps.

The same may be done with a regular direct laryngoscope. The advantage of video may be to provide magnification, to supervise learners in the removal of foreign bodies and may assist in visualizing deeper objects within the ear or nasal cavity.

pediatric video laryngoscope

Cmac 2
Cmac 3

Cmac 4


Other Tricks of the Trade discussing ear foreign bodies (insect in ear, bead in ear).

Author information

Yen Chow, MD CCFP

Yen Chow, MD CCFP

Emergency Physician, Thunder Bay Regional Health Sciences Centre;

Regional Medical Director, Ornge;

Assistant Professor, Emergency Medicine Section, Northern Ontario School of Medicine

The post Trick of the Trade: Pediatric video laryngoscope for ear foreign bodies appeared first on ALiEM.


Trick of the Trade: Knee Arthrocentesis

$
0
0

arthrocentesis2A patient comes into the ED and you suspect septic arthritis to the knee. As you consent the patient for arthrocentesis, you can tell s/he has reservations about a needle being inserted into their knee and left in place while you aspirate. You also think in the back of your mind how tricky it is to sometimes change syringes while keeping the needle in the correct location. Is there another way of tapping the knee without a needle?


Trick of the Trade: Use the angiocatheter for knee arthrocentesis

  • Prepare for arthrocentesis in the usual fashion (anteromedial or anterolateral approach)
  • Instead of attaching a needle to the syringe, attach an 18 gauge angiocatheter
  • Insert the angiocatheter while aspirating back on the syringe
  • When synovial fluid is aspirated, advance the catheter into the joint and remove the angiocatheter needle
  • The plastic catheter is left in the joint for aspiration

Benefit

  • No metal needle left in the knee, which may comfort some patients
  • No needle to secure if you need to change syringes
  • Convenient way to also administer intraarticular steroids/analgesics
  • Joint/catheter can be manipulated without fear of causing tissue injury

Pearls

  • Milk the joint/effusion to facilitate fluid collecting in the joint space
  • Slight manipulation of the joint may help the fluid re-distribute into the joint space
  • Aspirate as you slowly withdraw the catheter in case there is a residual fluid pocket
  • Be aware of a kinked catheter as an extreme angle may impede aspiration

Other pearls regarding septic arthritis? Check out synovial lactate for septic arthritis and the Paucis Verbis card: Septic Arthritis.

Has anyone tried the angiocatheter technique for knee arthrocentesis? We’d love to hear about your experience!


ALiEM Copyedit
ALiEM Copyedit
Expert Peer Review

Author information

Fred Wu, MHS, PA-C

Fred Wu, MHS, PA-C

Lead PA

Department of Emergency Medicine

Kaweah Delta Medical Center (Visalia, CA)

The post Trick of the Trade: Knee Arthrocentesis appeared first on ALiEM.

Trick of the Trade: L5 medial hamstring reflex

$
0
0

Reflex HammerTraditionally in medical school, it is taught that lower extremity deep tendon reflexes for L4 and S1 nerve root levels can be elicited by tapping on the patella and Achilles tendons. It was just taught that L5 didn’t have a reflex to check. Knowing if an L5 radiculopathy existed would be especially helpful when assessing a patient for a potential lumbar disc herniation where a careful lower extremity neurologic exam is important. It turns out one can actually check for a L5 reflex.

Trick of the Trade

L5 Medial Hamstring Reflex 

The authors of a 2012 study [1], which enrolled 100 consecutive patients with documented lumbar disc herniations, studied the accuracy rate of the patellar, medial hamstring, and Achilles reflexes to identify the correct disc level:

  • Patella (L4): 86%
  • Medial Hamstring (L5): 79%
  • Achilles (S1): 67%

How do you check the L5 medial hamstring reflex?

  1. For optimal visualization, place the patient in a prone position [2].
  2. Place your finger over the medial hamstring (semitendinosus and semimembranosus muscles).
  3. Tap over your finger and watch for medial hamstring contractions.
  4. Alternative but less ideal position: Supine position with the hip slightly externally rotated.


Thanks to Dr. Juan Carlos Montoy for teaching me about this.

References

  1. Esene IN, Meher A, Elzoghby MA, El-Bahy K, Kotb A, El-Hakim A. Diagnostic performance of the medial hamstring reflex in L5 radiculopathy. Surg Neurol Int. 2012;3:104. PMID: 23087820
  2. Perloff MD, Leroy AM, Ensrud ER. Teaching video neuroimages: the elusive L5 reflex. Neurology. 2010 Sep 14;75(11):e50. PMID: 20837959 [Free full text with 2 downloadable videos]


Author information

Michelle Lin, MD

ALiEM Editor-in-Chief

Editorial Board Member, Annals of Emergency Medicine

UCSF Academy Endowed Chair for EM Education

UCSF Associate Professor of Emergency Medicine

San Francisco General Hospital

The post Trick of the Trade: L5 medial hamstring reflex appeared first on ALiEM.

Trick of the Trade: Needle-vein alignment in ultrasound guided peripheral IV

$
0
0

ultrasound guided peripheral ivPlacing a peripheral IV under ultrasound guidance is often much more challenging than it outwardly appears, especially for novice users. One of the more difficult aspects is in making sure that the target vessel is perfectly in the middle of the screen and then guessing where that corresponds to the middle of the ultrasound probe.

Trick of the Trade:

Use the M-mode line to optimize needle-vein alignment

M-mode and ultrasound


Some ultrasound machines have a special line that can be superimposed down the middle of screen, though this is often buried in complex settings and is generally directed towards biopsies and other needle-guided procedures. For example, on Zonare machines this is called the “Biopsy Guide”.

For a simpler solution, one can use the M-mode line on many machines. M-mode displays one line over time and is especially useful for certain applications in emergency medicine like assessing for a pneumothorax or measuring fetal heart rates.

However, most machines require the user to press the M-mode button twice to engage it. Generally, the first press puts the M-mode line on the screen and then the user can move the line if needed or press the button again to start classic M-mode.

Instead, I press the button once to bring up the M-mode line directly in the middle of screen when placing peripheral IVs. I know that this line corresponds to the middle of the ultrasound probe and then I line up my IV catheter with the mark on the probe—knowing that it will proceed along the path of the vertical M-mode line.

Author information

Jeff Wiswell, MD

Jeff Wiswell, MD

Attending physician

Department of Emergency Medicine

Mayo Clinic Health System

The post Trick of the Trade: Needle-vein alignment in ultrasound guided peripheral IV appeared first on ALiEM.

Trick of the Trade: Eye pH

$
0
0

eye ph paper

Your patient presents with an ocular burn after accidentally splashing an industrial acid on his face. You, however, can not seem to find the ever elusive eye pH paper to track her initial and serial pH’s during copious ocular irrigation. Now what?


Trick of the Trade:
Use a urine dipstick reagent strip to check eye pH


UrineDipstick pH white balance SM

  1. Cut the dipstick strip so that pH is the last box.
  2. Gently touch the strip to the patient’s eye.

Caution

  • Be careful of the sharp edges on the trimmed dipstick strip when touching the patient’s eye.
  • Note that a urine dipstick can only detect a pH range of 5-8.5. Anything outside these ranges will require the eye pH paper, which can detect a range of 1-14.


References

Although no literature could be found on this in PubMed, it seems to be a fairly accepted practice:

  1. University of Ottawa Primary Care Ophthalmology website on eye irrigation
  2. Royal Children’s Hospital of Melbourne website on pediatric eye injuries


Credit for the trick goes to Dr. Eugene Izsak (Director Pediatric Emergency Medicine, Promedica Toledo Children’s Hospital; Clinical Professor of Pediatrics and Emergency Medicine, University of Toledo College of Medicine)

Author information

Michelle Lin, MD

ALiEM Editor-in-Chief

Editorial Board Member, Annals of Emergency Medicine

UCSF Academy Endowed Chair for EM Education

UCSF Associate Professor of Emergency Medicine

San Francisco General Hospital

The post Trick of the Trade: Eye pH appeared first on ALiEM.

Tricks of the Trade: Fluorescein application techniques for the eye

$
0
0

stain-fluoresceinApplication of fluorescein is a vital part of the workup of ocular complaints. Despite some studies showing questionable support, the typical cited clinical concern for stored fluorescein solutions is contimination with Pseudomonas and risk for iatrogenic infection with associated ulcer formation [1][2][3][4]. Subsequently, single dose sterile strips have become the standard agent stocked in most EDs. Many patients, especially children, can be apprehensive of the application of the physical strip directly to the eye, and are more comfortable with the concept of eye drops. In this post, we review multiple technique to create fluorescein solutions and additional tips for utilization that may be integrated into your practice, depending on the supplies available to you.

STRIP-IN-SYRINGE

This technique was first described in a guest post from Dr Ian Brown. The strip is placed directly into the syringe, and sterile saline is drawn in with the strip. The blunt filling needle is then removed, and the solution is ready for application.

Figure 1. Strip-In-Syringe Technique

MIX-IN-PACKAGING

This technique, utilizing a respiratory saline ampule and the strip packaging, is nicely photographed and explained in our prior post by Dr. Sam Ko and Dr. Kimberly Chan.

DAB-AND-WITHDRAW

Another technique contributed by ALiEM-AAEM Fellow Dr Matt Zuckerman creates a solution directly in the syringe or respiratory ampule of saline. If using a 10 cc flush, you will want to discard saline until 3 cc is remaining. Saline is expressed to create a droplet at the tip of the syringe/ampule, and the strip is dabbed directly to this droplet.  Aspirating brings the fluorescein solution back into the container. This will need to be repeated a few times to achieve appropriate concentration of fluorescein. Because the need for precise syringe-work, there is a potentially for small spills utilizing this technique, so plan accordingly.

Figure 2. Dab Technique. This can be performed with syringe or ampule of saline.

SPECIMEN CUP

This is a technique I frequently utilize in my department because of the supplies that are most readily available and some messy mishaps with the above dab-and-withdraw technique. Simply dispense 3 cc of sterile solution in a sterile specimen cup, mix the fluorescein directly into the solution, and then load into syringe. We did utilize a blunt filling needle in our example, but you may load directly into the syringe if you prefer. Left over solution in the cup can be used to explain the nature of the stain and also help motivate younger patients (“This will give you super glowing eyes!”).

Figure 3. Specimin Cup Technique

ANGIOCATH DROPPER

Regardless of the technique used to create a syringe of solution, there can be some awkwardness with application. Unlike the saline ampule, the syringe has properties which make it behave unlike a typical eye dropper. Overcoming the static friction of the syringe plunger can cause a sudden stream of fluorescein solution that can be uncomfortable or surprising for patients. This can also potentially stain clothing and lessen patients overall trust and comfort in the exam setting. I have found that applying a 24G angiocath tip to the Luer-Lok syringe can help create more control applying the solution. The small droplet size has also helped me successfully stain children who were squinting, foregoing the need to pry eyelids open and cause additional discomfort and anxiety.

Figure 4. Angiocather tip assists delivery of fluorescein solution

Happy Staining!

References

  1. Claoue C. Experimental contamination of Minims of fluorescein by Pseudomonas aeruginosa. Br J Ophthalmol. 1986  PMID:1041057 
  2. Duffner LR, Pflugfelder SC, Mandelbaum S, Childress LL. Potential bacterial contamination in fluorescein-anesthetic solutions. Am J Ophthalmol. 1990 PMID:2116089
  3. Rautenbach P, Wilson A, Gouws P. The reuse of opthalmic Minims: an unacceptable cross-infection risk? Eye (Lond). 2010 PMID:19247391
  4. Vaugh DG, Jr. The contamination of fluorescein solutions; with special reference to pseudomonas aeruginosa (bacillus pyocyaneus). Am J Ophthalmol. 1955 PMID:13218114 

Top image credit

Author information

Sam Shaikh, DO

Sam Shaikh, DO

Emergency Medicine resident

Sinai-Grace Hospital/ Detroit Medical Center

ALiEM-CORD Social Media and Digital Scholarship Fellow

The post Tricks of the Trade: Fluorescein application techniques for the eye appeared first on ALiEM.

Trick of the Trade: DIY Finger Traps

$
0
0

Fx_RadiusUlnaPadding copyDistal radius fractures are among the most commonly encountered fractures in the emergency department (ED). They have been reported to account for around 25% of pediatric fractures and up to 18% of fractures in the elderly [1]. Reducing minimally displaced distal radius fractures is a procedure that can be greatly facilitated by the presence of finger traps, which help hold traction while you reduce the fracture [2]. Often While working in small 5-bed, free-standing emergency department (ED), I found myself needing to perform this vital procedure and finger traps were unavailable.

Trick of the Trade: Gauze roll finger traps

While I searched the Internet for an answer, a nurse brought me a gauze roll and asked me if it might be helpful. After some trial and error, we found a method of tying the gauze roll around the fingers in such a way that we could easily use it as a substitute for the traditional finger traps. After the procedure we made a video showing how to do it:


Technique and Lessons Learned

  1. Tie one end of the gauze roll with a simple knot on the thumb, then wrap the free end around the index finger 2 times at the base of the finger
  2. Slip the free end into the proximal loop and out the distal loop towards the finger tips.
  3. Tighten until firm.
  4. Repeat the process for the middle and ring fingers. After the 4 fingers are prepared, take the end and wrap it around the index and middle fingers proximal to the previous knots (closer to the base of the fingers) 2 times.
  5. From the palmar side, take the free end and go underneath the gauze you just wrapped around the index and middle finger, and out through the dorsal side, always keeping the free end proximal to the previous loops.
  6. After that, make sure it’s tightened, and attach the free end to an IV pole.
  7. You are ready to commence your reduction.


References

  1. Nellans KW, Kowalski E, Chung KC. The epidemiology of distal radius fractures. Hand Clin. 2012;28:(2)113-25. PMID: 22554654.
  2. Wolfe SW. Distal radius fractures. In: Wolfe SW, Hotchkiss RN, Pederson WC, Kozin SH, editors. Green’s operative hand surgery. New York: Churchill Livingstone, 2011; 561-638
ALiEM Copyedit

Author information

Jacob Avila, MD RDMS

Jacob Avila, MD RDMS

Chief Resident, Emergency Medicine

University of Tennessee at Chattanooga

The post Trick of the Trade: DIY Finger Traps appeared first on ALiEM.

Trick of the Trade: DIY Circulating Water Bath for Frostbite Treatment

$
0
0

thermometer cold canstockphoto22282395A 26-year-old woman presented to an urban Detroit emergency department complaining of bilateral foot pain after walking outside in the snow for 30 minutes without shoes or socks. She was unable to ambulate secondary to the pain and swelling. Physical examination revealed bilateral pallor, doughy texture, and coolness to the touch. There was generalized tenderness to palpation throughout the digits. The overlying skin was edematous, although without signs of breakdown.

Background on Frostbite

Frostbite is a commonly encountered chief complaint during the winter months. It affects many groups of people including mountain climbers, “weekend warriors”, intoxicated individuals, those with underlying psychiatric impairment, and the homeless population. Frostbite is treated with warm water immersion in a circulating bath at water temperatures between 37 and 39 degrees C [1]. There are multiple commercial whirlpools available for reheating, however they cost thousands of dollars and are unfortunately unavailable at our institution.

Trick of the Trade: DIY Circulating Water Bath

We therefore created a whirlpool using a plastic tub, a sink with a faucet and a portable thermometer (Figure 1). The patient was placed on the standard gurney and placed adjacent to the sink. The tub was placed into the sink and filled with water until the monitored temperature was 37-39 degrees C using the hot and cold levers. Once the temperature was stable, the patient placed both of her feet into the warm water to begin re-warming. With the tub placed in the sink, there was continuous movement of water with the overflow going down into the sink drain. This effectively creates an immersion circulating water bath. This technique could be used for any body part that is easily placed into a sink and can be done with supplies readily available in most departments.


circulating water bath for frostbite

Figure 1. Easily create a water bath using a plastic tub placed into a sink and a thermometer to monitor the water temperature.

This period of re-warming takes approximately 10-30 minutes and should continue until the tissues are more pliable and distal erythema returns [2]. Our patient’s feet were rewarmed in our make-shift circulating bath. Her pain improved, the tissues became more pliable, and gradually the distal erythema returned to her toes. She was admitted to the hospital for a period of observation and pain control and was ultimately discharged following an uncomplicated course.

Take Home Points

  • The treatment of frostbite includes warm water immersion at water temperatures between 37 and 39 degrees C.
  • You can create a make-shift circulating bath using supplies that are readily available in most emergency departments: a plastic tub, a sink with a faucet, and a portable thermometer.
  • Other important considerations for frostbite treatment include prevention of tissue refreezing [1][2][3] and adequate pain control during rewarming.

References

  1. McIntosh SE, Opacic M, Freer L, et al. Wilderness Medical Society Practice Guidelines for the Prevention and Treatment of Frostbite: 2014 Update. Wilderness and Environmental Medicine. 2014;24, S43-S54.
  2. Zafren K, Giesbrecht G. Cold Injuries Guidelines. State of Alaska. 2014.
  3. Zafren K, Danzl, DF. Frostbite. In: Rosen P. Rosen’s Emergency Medicine – Concepts and Clinical Practice. Saunders; 2013: 1877-1882.
ALiEM Copyedit
Expert Peer Review
Expert Peer Review

(c) Can Stock Photo

Author information

Ciara Barclay-Buchanan, MD

Ciara Barclay-Buchanan, MD

Associate Residency Director, Emergency Medicine
Assistant Professor
University of Wisconsin School of Medicine and Public Health

The post Trick of the Trade: DIY Circulating Water Bath for Frostbite Treatment appeared first on ALiEM.


Trick of the Trade: Lactated Ringers for Sepsis Complicated by Hyponatremia

$
0
0

Sodium Na canstockphoto12825701An 82-year-old female is brought into the Emergency Department by family for a several day history of progressive altered mental status. You initiate a broad workup. However, soon after initial evaluation, you are called back into the room. The patient’s vitals are as follows and concerning for septic shock and an alarming serum sodium level.

Vital signs:

  • Blood pressure 89/65 (MAP 55)
  • Heart rate 105 bpm
  • Respiratory rate 18/min
  • Temperature 38.3C

Initial labs:

  • Serum sodium 105 mmol/L
  • Lactate 4 mmol/L

What is the safest way to volume resuscitate a hyponatremic, hypovolemic patient?

Likely the first instinct is to provide an isotonic fluid bolus of 20-30 mL/kg for septic shock. However, in chronic, severe, symptomatic hyponatremia, sodium correction should not exceed 0.5-1 mEq/L/h with a goal of 8-12 mEq/L/d to reduce the risk of central pontine myelinolysis (also known as osmotic demyelination syndrome) [1][2]. Acutely symptomatic (<48 hours) patients can be corrected safely at a faster rate with goal of increasing sodium by approximately 1-2 mEq/L/hr for 3-4 hours.

This is a nuanced case of fluid management, but can have long-term implications for an acutely ill patient. The ideal fluid choice would allow for adequate fluid resuscitation without rapid overcorrection of the sodium concentration.

Options for fluid resuscitation

Fluid Na+
(mEq/L)
Cl-
(mEq/L)
K+
(mEq/L)
Ca++
(mEq/L)
Mg++
(mEq/L)
Buffer pH Osmolality
(mOsm/L)
0.9% NaCl 154 154 5.7 308
Lactated Ringers 130 109 4 3 Lactate
(28)
6.4 273
3% saline 513 513 5.0 1026


Trick of the Trade: Lactated Ringers may be the safest choice

Compared to normal saline, Lactated Ringers provides twice the volume expansion for the same degree of correction of sodium due to the lower sodium concentration per liter.

This was calculated using MDCalc, which was derived based on a great NEJM review paper [3]. For example, the amount of fluid needed to increase the serum sodium by 1 mmol/L/hr for an elderly female with an estimated weight of 60 kg and an initial sodium concentration of 105 mmol/L:

Lactated Ringers: 1240 mL/hr
0.9% Normal Saline: 633 mL/hr
3% Saline: 76 mL/hr


MDcalc Na LR


The exact amount of volume that can be given for an expected 1 mmol/L/hr increase in serum sodium will change depending on your patient’s age, sex, weight, and starting sodium value and should be calculated for each individual patient.

Bottom Line

Be concerned about rapid sodium correction in a patient with symptomatic hyponatremia. Twice the amount of volume resuscitation with Lactated Ringers can be given compared to normal saline for the same degree of sodium correction.

References

  1. Vachharajani TJ, Zaman F, Abreo KD. Hyponatremia in Critically Ill Patients. J Intensive Care Med. 2003;18(1):3-8. PMID: 15189662.
  2. Sterns RH, Cappuccio JD, Silver SM, Cohen EP. Neurologic sequelae after treatment of severe hyponatremia: a multicenter perspective. J Am Soc Nephrol. 1994;4(8):1522-1530. PMID: 8025225.
  3. Adrogué HJ, Madias NE. Hyponatremia. N Engl J Med. 2000 May 25;342(21):1581-9.
    PMID: 10824078
ALiEM Copyedit
Expert Peer Review
Expert Peer Review

(c) Can Stock PPhoto

Author information

Kai Li, MD

Kai Li, MD

Emergency Medicine Resident

UCSF-SFGH Emergency Medicine Residency Program

The post Trick of the Trade: Lactated Ringers for Sepsis Complicated by Hyponatremia appeared first on ALiEM.

Trick of the Trade: Squeeze test for confirmation of IO placement

$
0
0

IO needlesVenipuncture is the most common invasive procedure performed in the emergency department [1], likely due to the fact that the vast majority of our laboratory evaluations require blood and many of our life saving interventions require access to the patient’s systemic circulation. Most of the time emergency department staff are able to perform this procedure easily, but occasionally you find that your patient is the dreaded “difficult stick”. Literature suggests that the landmark technique is successful on the initial venipuncture 74-77% of the time [2][3][4][5]. Success rates rise after multiple attempts, but what happens when you don’t have the luxury of time? What happens when your patient will die if you don’t get life saving medications into their circulation promptly?  There are a few options when you can’t get IV access through traditional means, among them external jugular vein cannulation, central line, ultrasound-guided IV, and the intraosseous lines (IO) [6]. However, when managing the crashing patient, a wise decision is to use the quickest option, which is often the IO.

There are already multiple methods for confirming IO placement, including return of bone marrow, visualization of blood in the stylet, firm placement of the needle in the bone, and the ability to smoothly deliver a fluid flush [1][7]. Here, we suggest another method.

Trick of the Trade for Confirmation of IO Placement

Check for IO flush resistance while squeezing around the site of placement

Recently, I placed an IO in a crashing obese patient and afterwards noted marrow and blood return and firm placement. After flushing and beginning to bolus fluids, I noticed that this awake patient seemed to be fairly comfortable with the fluids going into his tibia. This concerned me, as I recalled that a bolus infusion into the marrow has been reported to be a painful procedure. I elected to manually compress the area around the IO with both hands, and found that flow that I thought was going into the bone halted.  This confirmed my suspicion that I had in fact likely gone through the bone, and was infusing IV fluids into soft tissue.

IO-1

IO Squeeze
After the misplaced IO was removed and another was placed successfully on the contralateral tibia, the patient was successfully resuscitated and was able to be safely transported to a higher level of care. Afterwards, we did a literature search and found that we were not alone in considering this a method of IO confirmation.

Lee et al performed an experiment in the limbs of pigs and found that when the IO tip was placed in the subcutaneous tissue and the area around the needle was manually compressed, the pressure was transmitted into the syringe attached to the IO [6].

It is reasonable to assume this animal data can be applied to humans.  We’re not suggesting that this method replace other methods, but rather, that one can use this method as another tool in their quiver to help manage a crashing patient.

References

  1. Lewis GC, Crapo SA, Williams JG. Critical skills and procedures in emergency medicine: vascular access skills and procedures. Emerg Med Clin North Am. 2013;31:(1)59-86. PMID: 23200329.
  2. Elia F, Ferrari G, Molino P, et al. Standard-length catheters vs long catheters in ultrasound-guided peripheral vein cannulation. Am J Emerg Med. 2012;30(5):712-6. PMID: 21703801
  3. Jacobson AF, Winslow EH. Variables influencing intravenous catheter insertion difficulty and failure: an analysis of 339 intravenous catheter insertions. Heart Lung. 2005;34(5):345-59. PMID: 16157191.
  4. Minville V, Pianezza A, Asehnoune K, Cabardis S, Smail N. Prehospital intravenous line placement assessment in the French emergency system: a prospective study. Eur J Anaesthesiol. 2006;23(7):594-7 PMID: 16507183
  5. Fields JM, Piela NE, Au AK, Ku BS. Risk factors associated with difficult venous access in adult ED patients. Am J Emerg Med. 2014;32:(10)1179-82. PMID: 25171796
  6. Lee BK, Jeung KW, Lee HY, et al. Confirmation of intraosseous cannula placement based on pressure measured at the cannula during squeezing the extremity in a piglet model. Resuscitation. 2014;85:(1)143-7. PMID: 24036195
  7. Ngo AS, Oh JJ, Chen Y, Yong D, Ong ME. Intraosseous vascular access in adults using the EZ-IO in an emergency department. Int J Emerg Med. 2009;2:(3)155-60. PMID: 20157465

Author information

Jacob Avila, MD RDMS

Jacob Avila, MD RDMS

Chief Resident, Emergency Medicine

University of Tennessee at Chattanooga

The post Trick of the Trade: Squeeze test for confirmation of IO placement appeared first on ALiEM.

Trick of the Trade: Topical Tranexamic Acid Paste for Hemostasis

$
0
0

Traneamic-newTranexamic acid (TXA) can be used in a wide variety of settings in the Emergency Department for its hemostatic effects. Topical applications of TXA are commonly utilized to control minor bleeding from epistaxis, lacerations, or dental extractions.1–3 More in-depth reviews of topical TXA can be found on R.E.B.E.L EM4 and The Skeptics Guide to Emergency Medicine.5

In the United States, TXA is available as either a 100 mg/mL IV solution or 650 mg tablets. For topical applications, the IV formulation is most frequently used to soak dressings or gauze which are then applied to the affected area. Little published information exists regarding the use of topical TXA preparations made from tablets. Mouthwashes for anticoagulated patients undergoing minor oral surgeries have been utilized in dental practice.6 In a 2007 letter to the editor in Haemophila, Coetzee reports his success crushing TXA tablets and applying the powder to non-surgical skin wounds in two hemophiliac patients not responding to standard factor replacement therapies.7 To date, no literature is available describing the use of a TXA paste.

A paste made from TXA tablets offers similar hemostatic benefits of topical IV TXA administration and provides another option for drug delivery. Pastes may be easier to apply to, and/or remain on, certain anatomic locations.  Additionally, TXA tablets are less expensive than IV formulations. Vials of TXA cost approximately $100 compared to only $5 per 650 mg TXA tablet. At $100/dose compared to $15/dose, both patients and institutions benefit from utilizing TXA paste from a cost standpoint. Lastly, considering the current climate of drug shortages, of which IV TXA fell victim to in 2014, a topical TXA paste may be a reasonable alternative should the IV formulation become unavailable in the future.

TXA 650 mg

Tranexamic acid 650 mg tablets

Trick of the Trade: Tranexamic Acid Topical Paste

Recipe

  1. 3 TXA 650 mg tablets
  2. About 2 mL sterile water for injection

Directions

  1. Crush tablets with mortar and pestle and triturate into a fine powder
    • A pill crusher works almost as well if a mortar and pestle are not available
    • The paste can then be prepared in a plastic pill cup
  2. Add sterile water in small aliquots (~0.5 mL) and mix until a thick paste is formed
  3. Apply paste to desired site for 20-30 minutes and remove

tranexamic acid paste

TXA Paste 2

Additional Considerations

  • Use immediately upon compounding. Although oral mouthwashes containing tablets mixed in sterile water are reportedly stable for up to 5 days, stability data for the paste is not available.8
  • Time to cessation of bleeding after topical TXA has been similar in our experience whether prepared from an IV or PO product.
  • Epistaxis:
    • The paste may not be the best option for epistaxis as it may be difficult to remove all of the paste once applied in the nare(s).
    • Case reports exist for cessation of epistaxis in anticoagulated patients treated with topical IV TXA; however, it is unclear if a TXA paste will have similar results. 9
  • Our institution created an electronic order entry for TXA paste to promote consistency and standardize the process of ordering as well as preparation downstairs in the main pharmacy.
  • There is no published data regarding a topical paste recipe, therefore it is unclear if a smaller dose (e.g. 1-2 tablets) would be as effective as 3 tablets
  • In countries where TXA is supplied as 500 mg tablets, it is reasonable to consider the use of four 500 mg tablets (2000 mg instead of 1950 mg). However, slightly more sterile water may be required to achieve the same consistency as with three 650 mg tablets.

Application to Clinical Practice

  • For patients with minor bleeding not responding to direct pressure, consider topical TXA prior to the use of topical thrombin or more invasive therapies such as injectable lidocaine-epinephrine
  • Locations of minor bleeding in which we have had success include:
    • Post-dental extractions
    • Scalp lacerations
    • Extremity lacerations
1.
Patatanian E, Fugate S. Hemostatic mouthwashes in anticoagulated patients undergoing dental extraction. Ann Pharmacother. 2006;40(12):2205-2210. [PubMed]
2.
Noble S, Chitnis J. Case report: use of topical tranexamic acid to stop localised bleeding. Emerg Med J. 2013;30(6):509-510. [PubMed]
3.
Zahed R, Moharamzadeh P, Alizadeharasi S, Ghasemi A, Saeedi M. A new and rapid method for epistaxis treatment using injectable form of tranexamic acid topically: a randomized controlled trial. Am J Emerg Med. 2013;31(9):1389-1392. [PubMed]
4.
Hughes D. Topical Tranexamic Acid for Epistaxis or Oral Bleeds – R.E.B.E.L. EM – Emergency Medicine Blog. R.E.B.E.L. EM – Emergency Medicine Blog. http://rebelem.com/topical-tranexamic-acid-epistaxis-oral-bleeds/. Published July 14, 2014. Accessed October 29, 2016.
5.
Milne K, Hanel E. SGEM#53: Sunday, Bloody Sunday (Epistaxis and Tranexamic Acid). The Skeptics Guide to Emergency Medicine. http://thesgem.com/2013/11/sgem53-sunday-bloody-sunday-epistaxis-and-tranexamic-acid/. Published November 18, 2013. Accessed October 29, 2016.
6.
Ambados F. Letter to the editor. Preparing tranexamic acid 4.8% mouthwash. Australian Prescriber. 2003;26:75-77.
7.
Coetzee M. The use of topical crushed tranexamic acid tablets to control bleeding after dental surgery and from skin ulcers in haemophilia. Haemophilia. 2007;13(4):443-444. [PubMed]
8.
Lam M. Extemporaneous compounding of oral liquid dosage formulations and alternative drug delivery methods for anticancer drugs. Pharmacotherapy. 2011;31(2):164-192. [PubMed]
9.
Utkewicz M, Brunetti L, Awad N. Epistaxis complicated by rivaroxaban managed with topical tranexamic acid. Am J Emerg Med. 2015;33(9):1329.e5-7. [PubMed]

Author information

Scott Dietrich, PharmD

Scott Dietrich, PharmD

ED Clinical Pharmacist
St. Joseph's Hospital
Tampa, FL

The post Trick of the Trade: Topical Tranexamic Acid Paste for Hemostasis appeared first on ALiEM.

Trick of Trade: Build-it-yourself IV Fluid and Drug Administration Trainer

$
0
0

iv fluid and drug administration trainer IV simulatorSimulation equipment can be rather expensive and wanting to practice fluid and drug administration does not always warrant the purchase of specialized equipment. Luckily, a simple administration trainer can be made in less than 10 minutes and only costs a few dollars (or even nothing). This is an ideal option for resuscitation training if you are already using a manikin without IV arms or an IO option. Learners can practice preparing infusions and administering fluid or preparing an injection and administering it via the syringe port. This trainer can have multiple IV cannulas in one lid and can even include an intraosseous cannula, such as an EZ-IO.

Trick of the Trade: Build-it-yourself IV fluid and drug administration trainer

The following items are needed:

  1. A plastic container with a tight fitting lid (about 1 liter or larger in volume)
  2. A 3-way tap or IV extension set
  3. An IV cannula (size of your choice)
  4. IV strapping (Opsite, Tegaderm, etc.)
  5. A drill


Step 1: Close the container and drill a hole in the lid (about 4 mm in diameter)

Step 2: Take the needle out of an IV cannula, cut the 3-way tap off the extension set, and slide the tube onto the cannula

iv fluid and drug administration trainer Cannula and Tubing

Step 3: Cut the connector off and slide it through the hole that was drilled. Take any piece of plastic, such as the IV cannula cover, cut off a piece and place it under it, as shown. This prevents it from kinking the tube.

iv fluid and drug administration trainer

Step 4: Secure it in place with an Opsite/Tegaderm or similar dressing.


Final Product

The final product is easily cleaned and compact to store.

iv fluid and drug administration trainer final

Author information

Christoph Schroth

Christoph Schroth

Lecturer in Paramedic Science at Bournemouth University

I lived in South Africa and Namibia for 19 years, working in EMS, teaching first-aid and spending three years as an offshore clinic paramedic, as well as two years in a clinic on a Middle East oil & gas site.

The post Trick of Trade: Build-it-yourself IV Fluid and Drug Administration Trainer appeared first on ALiEM.

Trick of the Trade: Securing the intraosseous needle

$
0
0

intraosseous needle IO-secure So much attention is appropriately focused on the anatomy and technique for intraosseous needle placement. In contrast, very little attention is paid to securing the needle. Often this involves a make-shift setup which involves gauze, wraps, and/or tape. This becomes especially important in the prehospital setting where these can be easily dislodged. The following trick stems from a Twitter discussion in 2015 amongst prehospital providers, lamenting this fact.

Trick of the Trade

Use a mask from a bag valve mask (BVM) setup

Place the padded mask over the IO needle. The IV tubing can be threaded through the hole at the top of the mask. Secure the mask by wrapping circumferential tape around the extremity and mask as a unit. This mask trick works whether the IO needle is in the tibia, femur, or humerus. If available, you can use a pediatric mask for a less obtrusive setup – great tip by Ireland paramedic Eoghan Connolly (@EoghanCon11).

intraosseous needle

Image and trick courtesy of Scott Long (@FlightNurse30)


The mask also works for humeral IO lines and seems pretty secure with a prototype that Dr. Jonathan Fu and I tested on shift.

Author information

Michelle Lin, MD

ALiEM Editor-in-Chief
Academy Endowed Chair of EM Education
Professor of Clinical Emergency Medicine
University of California, San Francisco

The post Trick of the Trade: Securing the intraosseous needle appeared first on ALiEM.

Viewing all 78 articles
Browse latest View live